

In a world where new SEO tools are being created every day, it pays to offer something a little different—especially if you can offer your tool at an affordable price.
Link Whisper is one such tool—it offers powerful internal link-building possibilities without breaking the bank. In this guide, I’m going to teach you what Link Whisper does and how you can use it to your advantage. I’ll even offer advanced tips and a quick troubleshooting guide, so nothing can get between you and your internal link-building goals.
Introduction to Link Whisper (and why it’s useful for WordPress users)
As I hinted at in the introduction, Link Whisper is an internal link-building tool. You can download it both as a WordPress plugin and as a Shopify app; in this article, I’m going to focus on the WordPress plugin (though the Shopify app works almost exactly the same way).
Link Whisper does a few things extremely well:
- It automates internal link building
- It finds opportunities for internal links in existing content
- It finds content that has few internal links
- It helps find broken links (and it helps create redirects)
The tool does this by scanning every page and link on your website, and by recommending links as you write articles.
I’ve found this tool to be invaluable when taking on new clients who may not have been employing best practices from the start and when handling large e-commerce sites or sprawling blogs where orphaned pages are common. I’ve saved countless hours with Link Whisper—and I’m going to teach you how to do the same.
Setting up Link Whisper on your WordPress site
The first step is installing the Link Whisper plugin—fortunately, doing so is incredibly easy.
- Go to your WordPress admin page, and click Plugins. In most cases, you’ll need to select “Add new” in the drop-down menu that appears.
- Search for Link Whisper in the search box. Click “Install Now”

- Click on “Installed Plugins”, then find Link Whisper in the list. Click “Activate”

- Once Link Whisper is activated, you should see it in the menu on the left hand side.
%22%20transform%3D%22translate(.5%20.5)%22%20fill-opacity%3D%22.5%22%3E%3Cellipse%20fill%3D%22%232788d5%22%20cx%3D%2285%22%20cy%3D%2216%22%20rx%3D%22161%22%20ry%3D%2224%22%2F%3E%3Cellipse%20fill%3D%22%23453427%22%20cx%3D%2278%22%20cy%3D%22104%22%20rx%3D%22161%22%20ry%3D%2265%22%2F%3E%3Cpath%20fill%3D%22%2300315d%22%20d%3D%22M88%2032h50v8H88z%22%2F%3E%3Cpath%20fill%3D%22%233d79a8%22%20d%3D%22M136%2016h26v24h-26z%22%2F%3E%3C%2Fg%3E%3C%2Fsvg%3E)

Now that we have Link Whisper installed, it’s time to set it up and configure it so we can start building internal links.
Link Whisper configuration tips
Before we configure Link Whisper, we’ve got to ask it to scan our pages for links. You can do this by clicking the “Run Link Scan” button on the Report page.

Once Link Whisper has scanned your pages (this will take some time, especially if you have a large site), you can start configuring settings.
There are a lot of settings you can configure in Link Whisper:

Let’s look at what’s available above the fold. You can ask Link Whisper to ignore certain words (and numbers) when suggesting anchor text and links. You can also configure which post types and which terms it looks to create links from. Here’s some tips on these settings:
- I like to open internal links in the same tab and external links in a new tab on most websites.
- I’d recommend keeping “ignore numbers” on. Numbers are generally used in listicles, and it’s very rare that you’re writing the sentence “The 10 great things about X” without having planned to use that sentence as anchor text well in advance. There are exceptions to this rule, of course. Someone who is writing about 4x4s or 2x8s or TV resolutions (you get the idea) should probably turn “Ignore Numbers” off.
- The “Words to be Ignored” list is quite solid—you can always add a’s and about’s and any other words you’d like by editing the recommended anchor text. Add words that you don’t want included in links.
- Many sites will want to exclude Page content; your homepage, about us page, and similar pages may be your only Page content. This varies significantly from site to site, though.
Here’s what we can find below the fold (and a few tips):

- “Number of Sentences to Skip” can be changed to “Number of Paragraphs to Skip” by clicking the word “Sentences”. How you’ll use this depends on the site. I only like to use internal links after my first H2. On sites that are prone to long introductions, I’ll skip paragraphs. Sites with intros a few sentences long? I’ll skip 4 or 5 sentences.
- I recommend keeping “Max Number of Suggestions to Display” at “No Limit”—unless you’re prone to analysis paralysis, more options is better.
Now that your Link Whisper is configured, we can move on to how you’re actually going to use the thing!
Using Link Whisper to create internal links on your site
Internal link building is what Link Whisper does best. The goal of the tool is to automate internal linking in as many ways as possible. As such, Link Whisper offers three principal ways of building internal links:
- The outbound internal link tool, a post meta box that allows you to add links as you write content.
- The inbound internal link tool, which allows you to automatically link from existing content to an existing page.
- The auto-linking tool, which automatically links a given piece of anchor text to a given page.
I highly recommend using all of these tools to find link-building opportunities. The Auto Linking tool, in particular, is only available in the paid version—I’ll talk about it more in the “Advanced features” section.
Outbound internal linking
The outbound internal link tool is available in the WordPress editor—all you have to do is scroll down until you find Link Whisper.

*Image taken from Link Whisper’s website
The tool is ridiculously easy to use—the sentence containing recommended anchor text (taken from the post you’re writing) can be found in the column on the left, and the post it will link to can be found in the column on the right. Simply check off the anchor text that you want to add, then click “Update links”—just like that, your post will be full of internal links!
Note that it’s easy to change the anchor text used—you can simply use the WordPress post editor. Link Whisper’s outbound tool is also compatible with 3rd party WP editors like Elementor and Divi.
Inbound internal linking
There are several ways to access Link Whisper’s inbound internal linking tool. I’ll primarily access it either through the internal links report page or through the orphaned posts report page.
No matter how you access it, the functionality of the tool is the same. You’ll be able to see all of the internal links that point towards the page you select. You’ll also be able to move to the inbound linking tool—and that’s where the magic happens.
The tool scans your website for pages containing phrases that are viable as inbound anchor text to the page you’ve used the tool on. You can easily edit the anchor text that Link Whisper finds to make it more relevant to the page it will link to, and you’ll be able to select from a sometimes staggering number of suggestions. Adding links is as quick as checking boxes, then clicking “Add links”.
I love this tool—it’s my favorite thing about Link Whisper. I’m particularly fond of using it to find and add inbound internal links to orphaned posts (posts with no internal links). This makes sites easier for Google to crawl, and makes it simpler for users to get around and find the information they need.
Tips for effective internal linking
Link Whisper takes a lot of the guesswork out of internal linking, but I still have a few tips to help you get the most out of your internal links.
First, be sure to choose diverse and natural-looking anchor text, focusing mainly on partial matches. I’ve created a comprehensive guide to anchor text to help you do just that.
Next, take the time to think about which pages are performing well—and why those pages are performing well. You always want to link to relevant, high-quality content—even internally. Don’t bother linking to or from badly written content—delete or update this type of content, then link to and from it.
Finally, while internal linking is essential, it’s also important to have external links pointing to relevant and authoritative content.
Using Link Whisper to manage broken links on your site
Link Whisper also allows you to find and fix broken links on your website. There are other tools that can do this for you (Screaming Frog comes to mind), but Link Whisper does the job just fine—and why use two tools when you could use one?
All you have to do is go to the Error Report. You’ll see four columns: Post, Broken URL, Status, and Discovered. Note that this tool will find both broken internal and external links.
The columns are all pretty self-explanatory: The Post tells you the page the URL was found on, Broken URL tells you what the URL is, Status tells you what kind of error Link Whisper found, and Discovered tells you when the error was discovered.
You can get incredibly granular about which errors and redirects Link Whisper detects. Simply click the “Status codes” menu, and you’ll get a dropdown menu that looks something like this:

Find any links that match the statuses you care about, then simply edit the links in Link Whisper—or delete them. You can run this tool manually, but Link Whisper will check for link errors automatically and regularly (about every 10 minutes, in batches of 10 pages at a time).
Regularly checking for broken links on your website is best practice. You’ll also want to use things like 301 redirects when a page has changed location. It’s also a good idea to create an aesthetically pleasing 404 page on the off chance that you miss a broken link here or there.
Advanced features of Link Whisper
Link Whisper has a number of advanced features that make it an excellent tool for even the most granular technical SEO.
One of my favorite features is the ability to create links automatically. You can do this using Link Whisper’s auto-linking feature. All you do is input a piece of anchor text and the URL you want that anchor text to point to. From there, Link Whisper will automatically link existing and future instances of that anchor text to the specified URL.

There are a number of very useful settings for the auto-linking feature. You can, for example, schedule certain links to go live at a given time and date, effectively allowing you to schedule your links.
You can also set priorities for auto links so that a sentence that contains two or more possible auto links will always default to the one with the highest priority.
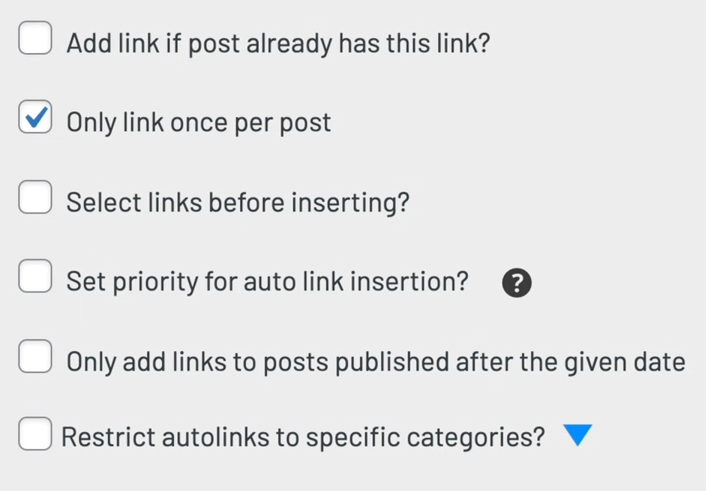
As you can see, there’s an incredible number of settings you can use to ensure that your automated link building never creates links you don’t want—I highly recommend keeping “only link one per post” on.
Troubleshooting common issues with Link Whisper
The most common issues that occur with Link Whisper are link creation issues, and plugin conflicts.
Link creation issues typically occur as a result of a problem with your settings—especially when auto linking. Check the following:
- Are the links contained within headings, or within the “Skip Sentences/Paragraphs” setting’s limit?
- Are you using a page builder or content module that Link Whisper doesn’t support?
- Is the post type one that’s enabled in Link Whisper’s settings?
- Does the sentence already have a link in it?
- Does the post already have a link to the same page in it, and have you turned on Link Whisper’s “only link once per post” setting?
Plugin conflicts are a bit more challenging to troubleshoot. When you get an error popup or a page that’s constantly loading, it’s usually a plugin conflict.
You can try turning off plugins one by one and seeing if Link Whisper starts working again. My advice, though, is to contact Link Whisper support—they should be able to tell you which plugins are causing the problems.
Conclusion and final thoughts on using Link Whisper for WordPress
I use Link Whisper on the vast majority of my sites—and I think you should, too.
The Premium version, with its auto-linking features and more granular settings, is the way to go. I use the Reports function regularly to see how densely linked my content is and to find orphaned pages and broken links.
I recommend scheduling a time to check the links on each of your sites—once or twice a month should be fine for most sites, but a weekly check-up may be a good idea for your largest sites.
All in all, Link Whisper has helped me dramatically improve the internal linking of my website; best of all, it takes a fraction of the time that internal linking used to take. I hope this guide helped you get the most out of Link Whisper!
Leave a Reply
You must be logged in to post a comment.